Since Premiere Pro (PP) has more efficiency to manager media files and package that, good at cooperation of project to co-edit and easily moves other platforms to continue editing. Many users choose it rather than Final Cut Pro X 10.4. The exciting thing is that Adobe has just released the latest versions of Creative Cloud apps including Premiere Pro CC 2017. But it is depressing that this latest version Adobe Premiere Pro still won't open some MP4 files.

|
Question 1: Now I have some MP4 files which are downloaded from internet and as its clarity was not good I thought of editing it using Premiere Pro application that was previously installed on my computer. However, when I tried to import MP4 file on PPro, it refused to get imported and displayed an error message that 'mp4 unsupported format or damaged file'. Is there any method that I can implement to resolve the issue?
Question 2: No audio track for an MP4 recoding in Premiere Pro this morning: After the premiere pro cc 2017 update I have some issues with clip sequences and audio. When starting a premiere pro file of the previous version the system says: "This project has been created with a previous version of Premiere Pro and has to be converted..." After clicking "OK", all the video sequences are missing. By trying to insert them manually, the audio files of the clips are missing.
I tried to start a new project with different video-clips and the same problems occur again. No audio files are in the project just the video file.
I tried to sign out and sign in to premiere pro following a troubleshooting instruction but it didnt work.
Anyone can help me? Thank you very much in advance.
Is MP4 supported by Adobe Premiere? If yes, why Premiere Pro CC (2017)/CS6/CS5 refuses to import MP4 videos sometimes? How to successfully import MP4 in Premiere Pro CC 2017, 2015.3, CS6, CS5, Elements 13/12/11/10, etc.? This article will explain the reason as well as provide the solution on how to solve MP4 and Premiere Pro incompatibility issue.
|
Why Premiere Pro won't Import MP4 Video Files?
Adobe Premiere did announce to import MP4, while it only imports two kinds of MP4: the one is Sony and JVC introduced XDCam-EX movie (.mp4), the other one is Apple created MPEG-4 (.m4v). That is to say, Premiere only import MP4 recorded from Sony camcorder, JVC camcorder or Apple's iPhone, iPad. It will end in fail if you try to import other MP4 file to Premiere Pro.
Other Reasons:
- Software malfunction could damage MP4 file and Adobe Premiere Pro fails to open it
- Improperly closing Premiere Pro application after editing MP4 video file in it might damage it leading to inaccessibility
- Edited MP4 file on Premiere Pro may get corrupted in case your system is infected with harmful viruses
- MP4 file may refuse to open on Adobe Premiere Pro tool in case the download process gets stopped by slow internet connection or unexpected system shutdown
|
How to Successfully Import MP4 to Premiere Pro for editing?
In order to successfully import MP4 to edit in Premiere Pro CC/CS6/CS5/Elements, a recommended solution is to convert or change the H.264 MP4, XDCAM EX, H.265 MP4 to a codec that PPro can natively handle like MOV, MPEG-2 or Apple Prores.
To be honest, it's not as hard as you imagine, what you need is just top Mac MP4 video converter like Dimo Video Converter Ultimate for Mac. After downloading and installing the gorgeous video converter gadget, you can effortlessly transcode unsupported MP4 to Adobe Premiere Pro friendly video format while keeping the excellent media quality.
More than that, it also supports fast converting other popular video formats including MOV, MKV, MPEG, WMV, H.265 … to seamlessly suit for Premiere Pro, Avid Media Composer, Final Cut Pro, iMovie, FCE, etc to satisfy your diverse editing demands. Now don't hesitate to download it and follow the step-by-step guide to transcode MP4 videos for editing in Premiere Pro smoothly. The program even has the advanced editing options to lets you fine-tune the final look of your movie. It also has its equivalent version for Windows users - Dimo Video Converter Ultimate to convert MP4 to Premiere Pro on Windows.
Make Preparation: Free Download MP4 to Premiere Pro Converter
Free Trial Free Trial
people have downloaded it
|
How to Convert and Import MP4 into Adobe Premiere Pro
Step 1. Add MP4 files
Install and run the best MP4 to Adobe Premiere Pro Converter, and click the "Add File" button to load MP4 video.
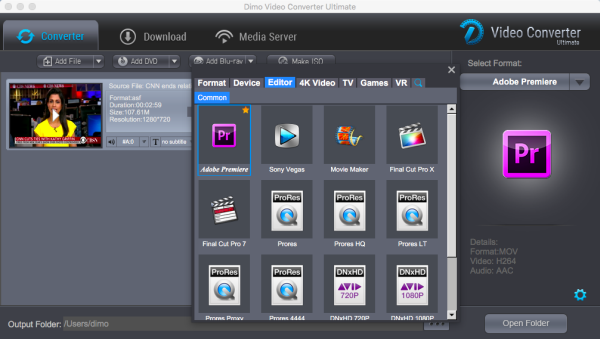
Step 2. Choose output format
This MP4 video converter offers optimized format preset for Adobe Premiere Pro. Just click the drop-down button of "Select Format", and then choose "Adobe Premiere" from "Editor" category under "Format". Or choose Apple Prores, MPEG-2 from "Video" for natively editing in Premiere Pro CC/CS6/CS5/Elements.
Note in the window, you'll see a variety of presets for iPhone, iPad, TV, etc. categorized in different lists. In most cases, you can just focus on them, which will save you a lot of time.
Step 3. Start converting MP4 to Adobe Premiere Pro
Click "Start" button to start converting MP4 to MOV/MPEG-2/Apple Prores for Adobe Premiere Pro program. Once the conversion is finished you can click "Open" button to get the output files effortlessly, and now you are ready to import and edit MP4 files with Adobe Premiere Pro. Just import the converted files to PPro for editing by using the Media Browser or the Import command and do whatever you wanna do. After editing, you can upload edited videos to YouTube, share on mobile devices or make an ISO file. It could have been so easy, right? Cheers.
|
Tips:
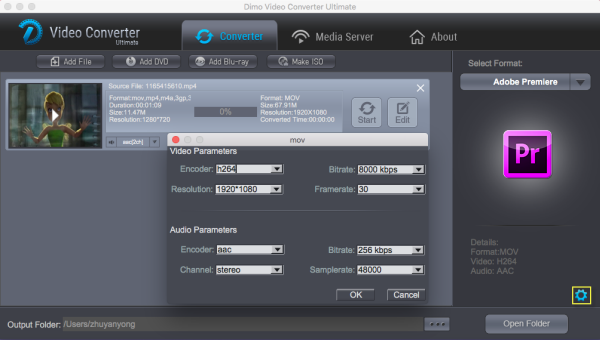
1. Adjust audio and video settings (optional)
If the default settings do not fit you requirement, you can click "Settings" icon and enter "Profile Settings" panel to adjust video size, bit rate, frame rate, sample rate and audio channels with this Mac MP4 to Premiere Pro Converter. This is mainly designed for power users who have a higher request for resulting video, and you can leave it alone.
2. Basic video editing (optional)
This top Mac MP4 converter enjoys a built-in video editor, so you can touch up the video with basic video editing functions. The supported video editing operations are: Trimming, cropping, appending artistic visual effects, adding watermarks and 3D effect to the videos. Just note that this step is skippable if you want to keep the original video effects.
|
Extended Knowledge
1. About "native editing"
The key feature that held the most sway was Premiere Pro's ability to edit natively with most formats. The possibility of being able to import P2 or DSLR footage into Premiere Pro and start cutting immediately.
What Exactly Does "Edit Natively" Mean?
According to Adobe, Premiere Pro is able to edit the following tapeless formats natively:
- Panasonic P2 (DV, DVCPRO, DVCPRO50, DVCPRO HD, AVC-Intra)
- Sony XDCAM, XDCAM HD, XDCAM HD422, XDCAM EX
- Canon XF
- Sony HDV
- JVC ProHD (both MP4 and MOV)
- Canon Digital SLR
- Nikon Digital SLR
- AVCHD and the Panasonic-branded equivalent, AVCCAM
- RED
But what does that mean in practical terms? Well, footage from any of these tapeless formats can be imported into Premiere Pro and edited immediately – no need to install any additional codecs, plug-ins, or import modules. There is no waiting for re-wrapping or transcoding because you are literally "linking" straight to the source files that you offloaded from the camera. Indeed, perhaps "linking" is a better term than "importing" to describe the video acquisition process in Premiere Pro.
When is Editing Natively Not Such a Good Idea?
Native editing workflows are perfect for about 80% of the projects I work on. These include projects that are done end-to-end by me in-house and on-site jobs like live events where time is of the essence. But despite the time-savings of native editing, there are some workflows where it just isn't practical.
For example, I recently completed a project in Premiere Pro for a particular production company that is still sitting on the fence and using Final Cut Pro Legacy. Although it was a corporate job and not for broadcast, I was essentially doing the offline edit. They were going to take over and do all the graphics and color grading themselves. Premiere Pro is able to efficiently export projects for Final Cut Pro (with XML), but since Final Cut wouldn't work with the native footage, I had to transcode everything to Prores 422 before I started editing.
There is also the issue of performance: I have heard complaints of chugging timelines when working with some native formats. I personally have not had any issues with Premiere Pro's performance when working natively. Having said that, I have not worked with all listed native formats and my machine is fairly fast. Transcoding to an intermediate codec like Prores does make thing easier on your CPU and can make for a better user experience. But as I said, this has not been the case for me so far and in my opinion native editing has been nothing short of a godsend.
Color Grading With Native Files In Premiere Pro
If you plan to finish your projects in Premiere Pro, you may be put off by the fact that some native formats can't work in greater than 8-bit depth. While that may be true in other applications that support native formats, Premiere Pro automatically up-samples your media to 4-4-4 on the fly (which may explain the reason behind potential chugging timelines mentioned above). So if you are going to color grade in Premiere Pro, you won't get any more latitude by transcoding to Prores or another intermediate codec. In fact, you may find your results are less satisfactory than if you stayed native.
Transcoding Your Footage With Adobe Media Composer
If any of the scenarios above apply to you and you need to transcode to an intermediate codec, you can easily transcode with Adobe Media Encoder. The first time I tried it wasn't so easy, however. I was short on time and in the mad rush was not able to figure it out. In the end I had to bail and turn to an old standby, Compressor. Ever dreamed to get an Adobe Media Encoder Alternative? Then Dimo Video Converter Ultimate for Win/Mac can be your best choice.
|
2. Learn five editing basics in Premiere Pro
There are five basic things you should know how to do in Premiere Pro.
1. Import footage > 2. Create a sequence > 3. Add a title > 4. Add and adjust audio > 5. Export to YouTube
Find details in this article.
|
3. How to fix "audio not working on Premiere Pro CC 2017" issue?
Here are four solution which may work for you:
a. Please clear the Media Cache & check the audio in the timeline.
Instructions are in the following link: How to clean media cache files. If you want to install the Previous version of Premiere Pro, please check the instructions in this link: How do I reinstall Premiere Pro CC 2015.2 (9.2)
b. Try to upload an random mp3 file, and now upload your mp4/avi file, you can delete the mp3.
b. First, close ALL running Adobe programs. Next, on the PC hit "Window" and "R" keys at the same time to bring up the run command window. Type in "%appdata%". In that window open the "Adobe" folder and find the "Common" folder. Rename that to "Common1" or delete it entirely. That should fix the problem!
d. Create new folders where ever your project is stored, copy all the video files from the old folder to the new, open Premiere, replace old files in the project with files the same files from the new folder.
|
Have more questions about how to convert, import and edit MP4 in Premiere Pro (CC 2017 included), please feel free to contact us>>
